Back to InventoryDirect Main Menu
Using Pick Lists
When you issue inventory, you have the option to assign that issue to a pick list. A pick list allows you to print out a group of issued inventory so they can be retrieved from a warehouse. Think of it as a “Grocery List” of items that need to be collected and delivered.
Watch the Video Tutorial:

Creating and Adding Items to a New Pick List
Pick lists can be created independently or from within the transaction screens as you are processing issues. Whether you are processing a New Request or adding a new Issue, you will have the option to create a new Pick List and assign the issued items to it.
Adding a New Pick List Independently
- Click on the Pick List link under the Transactions section of the InventoryDirect home page.
- This will bring you to a list of the existing pick lists in the account. Click on the New Pick List link in the Shortcuts section at the top of the page.
- Enter a Pick List Name and click Submit.
- This Pick List will now be an available selection as you are processing your issues.
Adding Items to a Pick List from the Process New Requests Page
- Click on the number under Waiting For Approval on your Inventory home page.
- On the Process New Requests page, you can select an existing Pick List from the drop down list or you can click on the Create New Pick List button.
- Enter the Pick List Name in the pop-up box and click OK. *Note: If you leave the name blank, the system will assign one using the number of the pick list and today's date (Example: 108 - 4/9/2017).
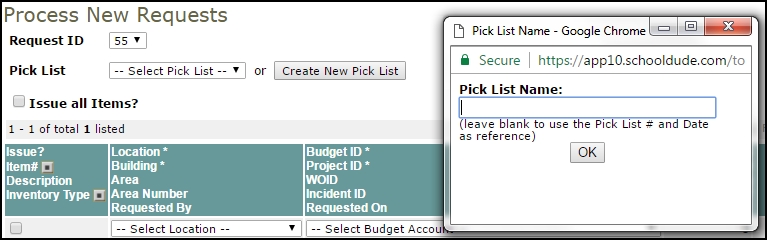
- Select the appropriate pick list, process the request, and click Submit to save.
Adding Items to a Pick List from a New Issue Transaction
- If you are entering issues that have not come from a request in the system, click on the Issue tab at the top of the screen.
- Click on the New Issue link in the Shortcuts section.
- Enter the information for the items you are issuing.
- Next to Pick List, select an existing Pick List from the drop down list or you can create a new one by clicking on the Create New Pick List button.
- Enter the Pick List Name in the pop-up box and click OK. *Note: If you leave the name blank, the system will assign one using the number of the pick list and today's date (Example: 108 - 4/9/2017).
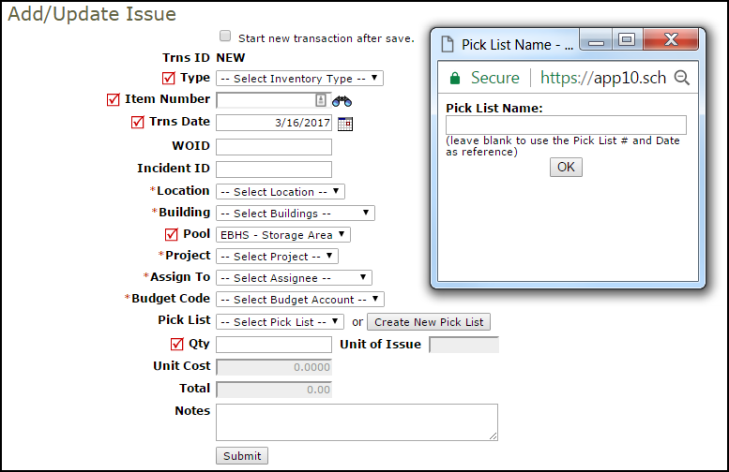
- Click Submit at the bottom of the screen to issue the items and add them to the selected pick list.
Printing a Pick List
- Click on the Pick List link under the Transactions section of the InventoryDirect home page.
- This will bring you to a list of the existing pick lists in the account where you can see the date it was created, the number of requests/issues assigned to it, and the date it was last printed. *Note: Any pick list that does not have issues assigned to it can be deleted from the list by clicking the red x on the right side of the list.
- Click on the printer icon beside the number of the pick list you wish to print.

- In the pop-up box, select if you would like to sort the pick list by Aisle/Bin or Item Number, and then click Print Pick List.
- You will see a print preview of your pick list that you can then send to your printer.
Printing a Pick List Delivery Receipt
The Pick List Delivery Receipt sorts the issued items by their Delivery location and will print each location on a separate page. It also includes signature and date lines at the bottom of each page for the receiver to sign and confirm delivery.
- Click on the Pick List link under the Transactions section of the InventoryDirect home page.
- Click the Print Pick List Delivery Receipt link in the Shortcuts section at the top of the page.
- In Step 1, identify the Reporting Period by either choosing a predefined date range from the drop down list or entering custom begin and end dates.
- In Steps 2 through 11 make selections to narrow down the report by Location, Inventory Type, Pick List, etc. *Note: If you need to print a delivery ticket for one specific pick list, you can simply select the date in Step 1 and the pick list name in Step 8.
- Select PDF as the Report Format.
- Click Print This!
- You will see a print preview of the Delivery Receipt that you can then send to your printer.
